与上个文章有关,魔门云:一家免费套餐中支持https的CDN,我的主机在法兰克福,使用魔门云CDN给国内的朋友加速。效果很不错但是有个小瑕疵就像我在那个帖子说的那样,统计插件里边的ip都成了CDN服务器的ip,标识地址的国旗全变成了香港旗帜,Apache的log也统一记录的只有那几个CDN的来访地址。
查询网上帖子了解到这个插件:mod_rpaf模块,解决Apache服务器在CDN后获取真实ip的问题。我总结了一下安装过程,还是挺简单的。
首先官方yum库里边没有这个插件,需要从网上找资源下载,很多帖子都贴出一些地址,可是这些地址很容易失效或者出现不同版本linux兼容问题,甚至还有可能出现带病毒的问题。所以在我的教程中直接从作者github下载源码编译,这样上边的所有问题都一次性解决,最为理想的方式并且也不复杂。
首先安装一些git以及编译需要用到工具: sudo yum install git make gcc httpd24-devel vim(对于apache版本httpd24-devel可能不同)
然后下载mod_rpaf源码: git clone https://github.com/gnif/mod_rpaf.git
编译,安装:
sudo make
sudo make install
在Apache配置文件中添加对这个模块的加载以及配置信息,可以直接添加在httpd.conf中在我的系统中这个文件在/etc/httpd/conf/httpd.conf,很多教程也是这样讲的,但是我看在我的虚拟机中默认把模块的配置文件分出来了放在了/etc/httpd/conf.modules.d(这些扩展配置文件都是被主配置文件httpd.conf调用的),为了保持统一,我也就学习系统默认的样子将这个模块的配置放在这个文件夹:
sudo vim /etc/httpd/conf.modules.d/mod-rpaf.conf
将下边内容填入这个文本:
LoadModule rpaf_module modules/mod_rpaf.so
RPAF_Enable On
RPAF_Header X-Forwarded-For
RPAF_ProxyIPs 119.28.0.0/16 106.75.0.0/16 120.132.0.0/16 121.201.0.0/16 139.198.0.0/16 43.255.29.0/24 103.74.193.0/24
RPAF_SetHostName On
RPAF_SetHTTPS On
RPAF_SetPort On
RPAF_ForbidIfNotProxy Off
其中,RPAF_ProxyIPs后边需要填CDN服务器的ip,这个可以从CDN帮助文档中找到,比如说我用的魔云门类似于这样的:https://docs.cachemoment.com/faq/using/ip-list.html。
这样Apache服务器就能识别X-Real-IP 和X-Forwarded-For 两个标签。找到下边的这配置日志记录的一段,替换成下边的内容:
<IfModule log_config_module>
#
# The following directives define some format nicknames for use with
# a CustomLog directive (see below).
#
LogFormat "%h %l %u %t \"%r\" %>s %b \"%{Referer}i\" \"%{User-Agent}i\"" combined
LogFormat "%h %l %u %t \"%r\" %>s %b" common

#get the original IP when use CDN
LogFormat "%{X-Forwarded-For}i %l %u %t \"%r\" %>s %b \"%{Referer}i\" \"%{User-Agent}i\"" custom

##########

<IfModule logio_module>
# You need to enable mod_logio.c to use %I and %O

# LogFormat "%h %l %u %t \"%r\" %>s %b \"%{Referer}i\" \"%{User-Agent}i\" %I %O" combinedio

</IfModule>

#
# The location and format of the access logfile (Common Logfile Format).
# If you do not define any access logfiles within a <VirtualHost>
# container, they will be logged here. Contrariwise, if you *do*
# define per-<VirtualHost> access logfiles, transactions will be
# logged therein and *not* in this file.
#
#CustomLog "logs/access_log" common

#
# If you prefer a logfile with access, agent, and referer information
# (Combined Logfile Format) you can use the following directive.
#

########
#CustomLog "logs/access_log" combined
CustomLog "logs/access_log" custom
</IfModule>
其实就说添加了一个新的记录形式并且执行新的形式。保存退出,然后重启Apache: sudo service httpd restart
网上的教程几乎都是到这里位置了,但是我的网站由于启动了https,测试后会发现,这里修改只影响了http访问的流量记录,日志文件为:/etc/httpd/logs/access_log, 这时候http访问已经可以记录真实ip了,可是https记录还是保持原来的状态:/etc/httpd/logs/ssl_access_log
这也是本文关键点之一了,需要修改ssl的配置:在我的机子上ssl的配置文件在这里: /etc/httpd/conf.d/ssl.conf,找到下边一行注释掉,并添加新的配置信息,一看就明白是调用刚才写的那种日志形式。
#TransferLog logs/ssl_access_log
CustomLog “logs/ssl_access_log” custom
这样重启Apache后在ssl_access_log就能记录CDN后真实的ip了。
到这里,网上大部分的教程结束了,可是我悲伤的发现,我的问题并没有解决,wordpress中的slimstat统计插件还是识别的CDN地址,真实ip也还是仅仅写在一个括号里。我大约也开始明白这里的原因,虽然apache服务器有能力读懂X-Forwarded-For标识并且得到真实ip,但是对于php还是不能正确做出应对,解决方法也很简单,添加下边的代码到网站根目录wp-config.php里:
if (isset($_SERVER['HTTP_X_REAL_IP'])) {
$_SERVER['REMOTE_ADDR'] = $_SERVER['HTTP_X_REAL_IP'];
}
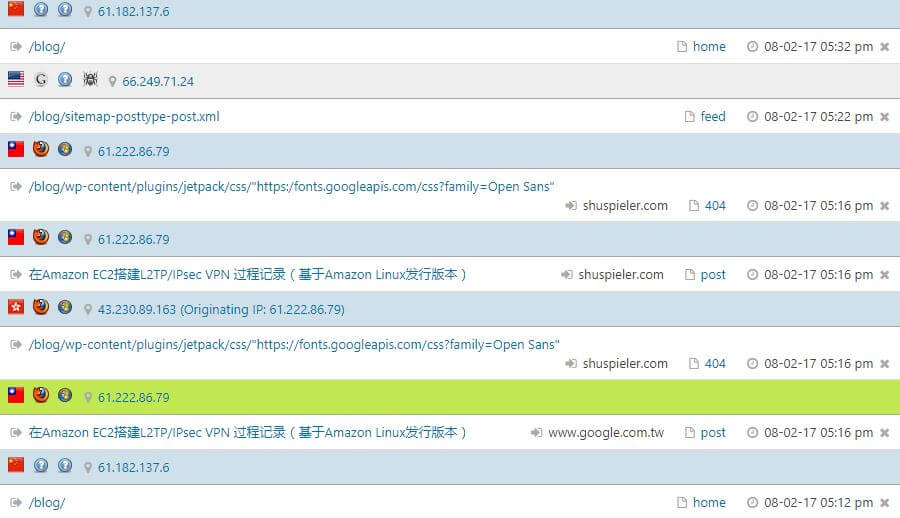
效果非常好,不需要重启服务,只需要刷新网页就会发现之后的记录国旗标识又能真正常显示了,到此全部问题解决。
参考链接:
https://github.com/gnif/mod_rpaf
http://blog.csdn.net/wm_1991/article/details/51924141
http://www.linuxdown.net/install/soft/2016/0122/4438.html
http://blog.chinaunix.net/uid-10449864-id-3244087.html